In-floor radiant heat is here to revolutionize your heating experience by warming up the entire floor.This innovative heating system can be achieved through two methods: using pipes carrying hot water embedded in or below the floor or using electric mats embedded in the floor itself.
In this guide, we will focus on the installation of electric mat radiant floor heat, providing you with the basic steps to get started and enjoy the comfort of heated floors.
Types of Radiant Heat
Radiant heat supplied by hot water, known as hydronic heating, is widely used in larger installations due to its economic advantages over electric heating. The ability to minutely control the water flow allows this system to provide heat precisely where and when it’s needed.
A hydronic radiant floor system shares similarities with a zoned-baseboard heat system in terms of complexity. It relies on a boiler heated by gas, oil, or electricity, along with valves, manifolds, and sophisticated thermostats to effectively distribute and regulate the water flow for optimal heating control.
Electric radiant floor heat systems are specifically designed for underfloor warming. These systems are installed directly over the subflooring before the finished flooring is applied. They are primarily used as supplemental heat sources, making them an excellent choice for retrofitting projects. Some electric systems even incorporate wires that double as thermostats, simplifying the installation process. Moreover, there is no need to purchase a separate furnace, resulting in lower initial costs, and the absence of pipes minimizes the risk of freezing or leaking.
However, it’s important to consider that installing electric radiant floor heat requires careful planning and the addition of a new circuit from the electric panel. If you are not comfortable with this task, it is advisable to hire a qualified electrician to ensure a proper and safe installation.
Where to Install
Hydronic radiant heat systems offer installation flexibility, as they can be installed either above or below the subfloor.
On the other hand, electric radiant floor heat is specifically installed over the subfloor, with the heat source directly warming up the flooring rather than the subfloor itself.
In retrofit projects, it’s important to consider that electric radiant floor heat may raise the floor by around an inch, depending on the manufacturer. Therefore, it is crucial to plan accordingly for the increased thickness at door transitions and around appliances to ensure a smooth and seamless transition.
Electric radiant heating is the most effective and commonly used under tile floors. However, it can also be installed under vinyl, engineered flooring, and wood floors. It is essential to carefully read and follow the manufacturer’s guidelines for installation. When it comes to carpeted floors, the success of electric radiant heating depends on the length of the weave. Thick carpets or those with thick pads may not work well as the heat generated by the system can become trapped in the floor and hinder its effectiveness.
Installing Underfloor Electric Radiant Heat
When it comes to electric radiant heat systems, there are two main types: loose cable systems and mats embedded with cable. Loose cable systems consist of pre-cut spooled cables, with lengths varying based on the coverage area. Installing loose cable systems can be a bit challenging, as attaching the cable to the subfloor requires careful handling and attention.
On the other hand, mats are simpler to install and wire. They consist of mesh or fiber mats with embedded cables. These mats can be attached through the mat itself rather than the wire, making the installation process easier to manage. Both loose cable systems and mats designed for above-the-floor installation need to be covered with a layer of mortar for protection and proper functioning.
Before proceeding with in-floor heating installation, it’s crucial to consult an electrician to ensure that your existing electrical system can accommodate the new circuit, if one is required. Generally, you will need between 8 and 12 watts per square foot of heated floor to achieve optimal performance and comfort. You can also buy an electric floor warming kit on our web site.
Inspect and Test the Mat
Before proceeding with the installation, it is important to inspect the mat, control unit, and sensor for any visible damage. Look for any signs of physical harm, such as cuts, tears, or exposed wires. If you notice any damage, contact the manufacturer for guidance or replacement.
To ensure proper functionality, you can use a digital multimeter to measure the resistance between the conductors of the mat power leads. Follow the manufacturer’s instructions and specifications for the specific procedure. This step helps verify the integrity of the mat and ensures that it is functioning within the expected resistance range.
Rough-In the Electrical
Before the installation of a heated floor, it is essential to refer to all local building and electrical codes to ensure compliance and safety.
Depending on the manufacturer’s specifications, it may be necessary to run a dedicated electrical circuit to power the electric radiant heating system. Some systems can utilize an existing circuit if it has sufficient power capacity. Ensure that you adhere to the manufacturer’s recommendations and consult with an electrician if needed.
For electrical safety, some electric radiant systems come with integrated GFCI (Ground Fault Circuit Interrupter) protection, while others require GFCI or AFCI (Arc Fault Circuit Interrupter) protection from the circuit breaker. Follow the manufacturer’s instructions and local electrical codes to determine the necessary protection measures.
During the installation process, it is crucial to install an electrical box for the system control unit, which typically includes an on/off switch, thermostat, or timer. This provides a designated and secure location for controlling the electric radiant heating system.
Referencing the manufacturer’s instructions, drill holes in the bottom plate as required. Typically, this involves drilling two holes directly below the system control box on the bottom plate. One hole is intended for the power lead from the mesh, while the other is for the thermostat sensor.
To ensure proper electrical connectivity, install the appropriate 12 or 14 AWG (American Wire Gauge) feed wire from the breaker or circuit that you are tapping into for power. This step guarantees the proper flow of electricity to the electrical box and the system control unit.
Install the Mat
As you progress with the installation of the in-floor heating system, ensure that the subfloor is thoroughly cleaned by sweeping or vacuuming to remove any dirt or debris. Take a close look at the subfloor to confirm that there are no screws, nails, or other objects that could potentially damage the heating cable.
Position the mat on the floor in a manner that allows the power lead to reach the electrical box. Test fit the mat by rolling it out, flipping it over as needed to accommodate the space. Remember, the heating wire cannot be cut or routed into the wall, under baseboards, or similar locations. It must be fully embedded in the floor mortar.
Consult the manufacturer’s guidelines for precise routing instructions for the mat. Typically, this entails keeping the mat 4 to 6 inches away from walls, showers, tubs, and approximately 6 inches away from the toilet wax ring. Ensure that the heating wire does not end up beneath finish trim like door casings or baseboards.
Secure the mat to the floor using double-sided tape, hot glue, or pneumatic staples. If utilizing staples, be cautious to maintain a distance of more than ¼ inch from the heating wire to prevent any damage.
Repeating step 1, use a digital multimeter to measure the resistance between the conductors of the mat to verify proper functionality.
Feed the power lead and temperature sensor wire to the electrical box. Depending on the situation, you may need fish tape to route the wires behind finished wall surfaces.
Chisel a notch in the floor to recess the factory splice, ensuring it doesn’t protrude above the top level of the rest of the mesh.
To protect the holes in the bottom plate from stray nails, install a metal nail plate across them.
Finally, once the electric mat is securely in place, it is advisable to take photos of the system. These photos can serve as a reference for future maintenance or troubleshooting purposes.
Install the Controls
Before proceeding, ensure that the power to the feed wire installed in Step 2 is switched off.
Connect the power lead from the heating mat to the feed wire, ensuring a secure and proper connection.
Next, follow the manufacturer’s instructions to connect the floor heating thermostat and controls to the wire. Pay close attention to the specific guidelines provided by the manufacturer for accurate wiring and connections.
Pro Tip : You should not turn on the power to the system except for a brief test. It is crucial to strictly adhere to the manufacturer’s guidance for testing the system to ensure its proper functioning and safety.
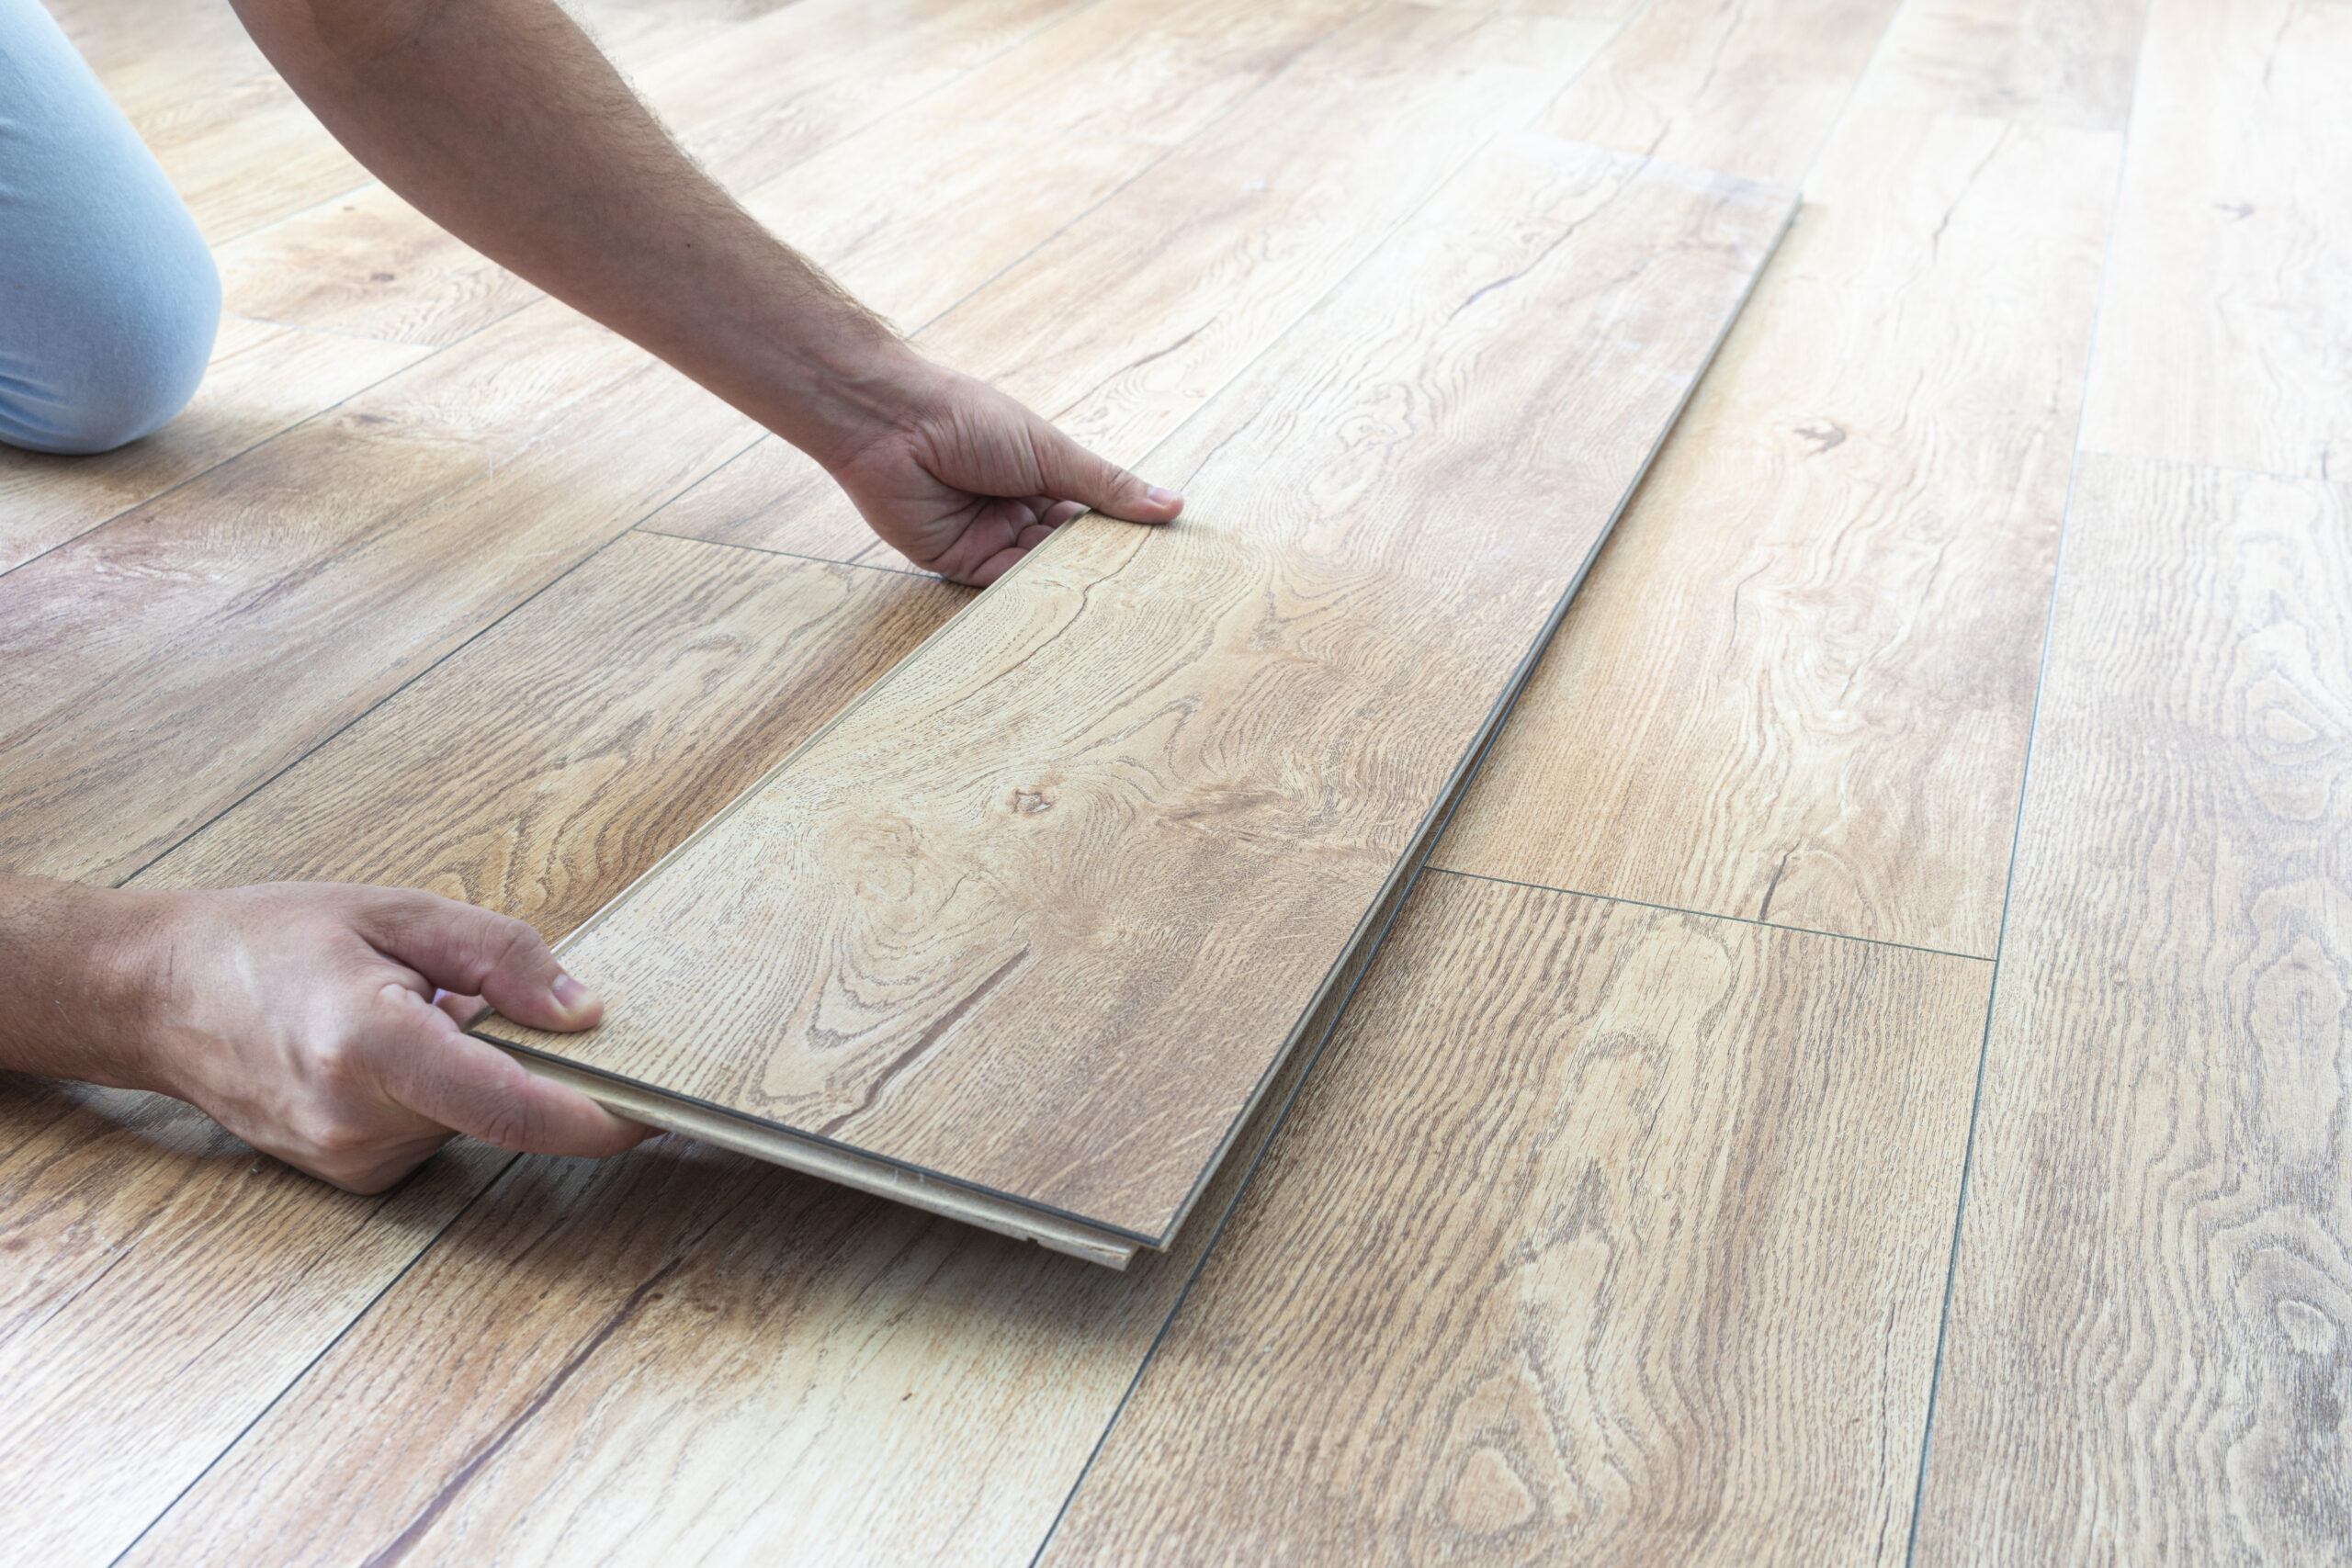
Install the Flooring
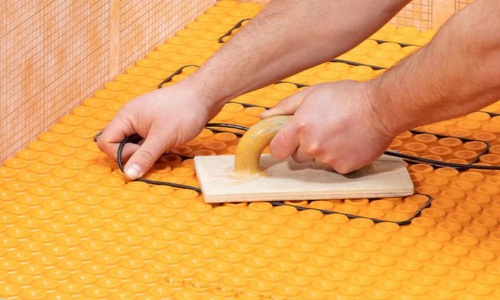
When installing tile, it is recommended to use a polymer-modified thin-set directly over the heating mat. Exercise caution to avoid damaging the wire while spreading the thin set using a trowel. Make sure to follow the manufacturer’s instructions and guidelines for the thin-set application.
If you are installing laminates, hardwood, or carpets, it is advised to apply a self-leveling compound over the heating mat. Again, refer to the manufacturer’s instructions for the specific type of self-leveling compound and its application process.
Pro Tip: Regardless of the floor covering you choose, it is crucial to ensure that the heating mat is fully encapsulated in a mortar bed. This means that the mat should be completely covered and embedded in a layer of mortar for proper protection and heat distribution.
In Summary
Now that you have gained a basic understanding of how to install heated floors, you can make an informed decision on whether a DIY heated floor project is suitable for you.
However, if you require assistance or feel more comfortable with professional installation, it is advisable to reach out to a qualified professional. They have the expertise and experience to ensure a proper and efficient installation of underfloor heating.